sdserlin
-
Posts
6 -
Joined
-
Last visited
sdserlin's Achievements
")
Newbie (1/14)
0
Reputation
-
Hello, I have to create an installation executable. I have a bunch of old dos programs and supporting files, plus a zip file, and a dosbox executable to install via a LabVIEW VI built into an executable via app builder. The LabVIEW VI needs to copy the old dos programs and supporting files from the project to the user's hard drive and place the files in their correct locations on the users' hard drives. Plus, the LabVIEW VI needs to extract the zip file and launch the dosbox executable to install dosbox. The source of the old dos programs and supporting files, zip file, and dosbox executable needs to be virtual as the users will not have access to my hard drive nor any network mapped drives where the installation files will initially be located. What I cannot figure out is how to call the path and files from the project tree into the LabVIEW VI without getting an error regarding absolute path after I have copied the files from my mapped drive into the a virtual folder in the project tree. Since the user won't have access to my hard drive nor a network drive when this VI is built into an installation application (they will have a usb stick or disk), how do I get around this error? I thought that was the point of the virtual folder so that I did not have to have an absolute path to the source files in the VI. I know that I can include the source files using app builder but that does not address the issue of controlling the installation using the VI. Any thoughts how to accomplish this using LabVIEW, virtual folders, and their project tree?
-
I have a tree control that has the selection mode set to array. I need to set the highlighted row of both a parent or a child. Only one row at a time to simplify things. I do not know if there are two steps to this. One step being to change rows and another to turn on a highlight property on that row. I have not been able to figure this out. Any suggestions?

-
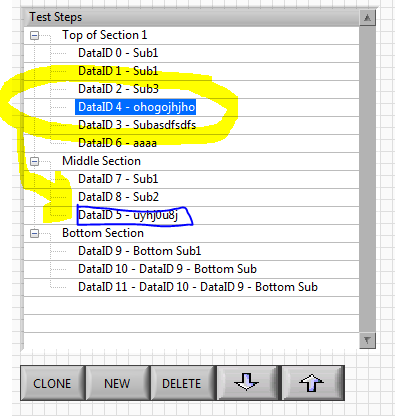
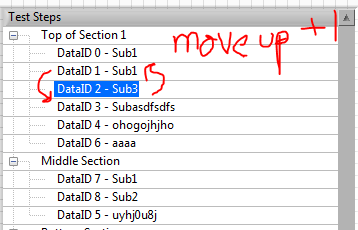
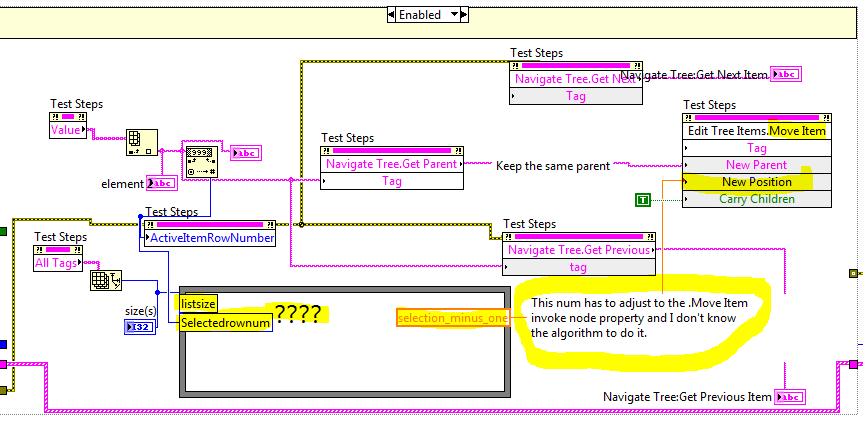
Edit Tree Items.Move Item functionality implementation is tricky
sdserlin replied to sdserlin's topic in User Interface
Thank you for your help. That is exactly what I was looking for. -
The help page on the Edit Tree Items: Move Item Method states for "New Position": "Sets where to place the item in relation to the item whose tag you wire to New Parent. Wire a value of 0 (default) to place the item above the first child item, wire a value of 1 to place the item above the second child item, and so on. Wire a value of –1 to place the item under the last child item. If the value you wire to this input is greater than the number of child items under the parent item, the method places the item under the last child item." If I do not know in advance what the new position will be until the user chooses an item on the tree, what algorithm can take the selection row number and then adjust this "new position" value to move up by one row or down by one row? I can't just take the ActiveItemRowNumber and subtract one or add one to get the previous item-row-number or the next item-row-number and then take that value into the "Edit Tree Items.Move item" invoke node because the .Move item node does not work that way. Why it doesn't is beyond me. Nonetheless, I need a workaround to this issue. Any suggestions?
-
Preventing duplicate entries in a single column scalar listbox?
sdserlin replied to sdserlin's topic in User Interface
Hello, Thanks for responding to my post. Your assumption is essentially correct. I do have a listbox (scalar, single column). The user should only be able to append to the listbox via a string input if the input is not in the listbox already. I will try your recommendation. I think your solution that may work for my situation. I appreciate the help. If I do not reply to this thread again, please assume that it work and I thank you in advance for your help. Scott -
Other than doing a match pattern compare of a user input to the scalar listbox entries, how can one determine if a user has entered in a duplicate value into the scalar listbox? Note - I have my listbox built into an event structure which merely compounds the problem.