
About This File
Mark Balla Icon editor V2.7
December 2020
Author: Mark Balla
Description:
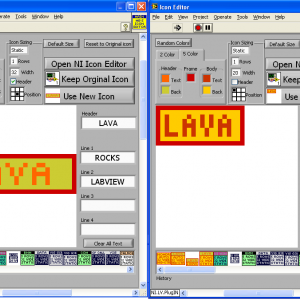
This is a text based vi icon editor
The purpose is to help quickly create text base icons.
The editor can be used in place of the standard NI icon editor or as a stand alone vi. see instructions.
Version 2.7
Updated font table to recognize the standard "Small Font" letters used by the NI icon editor. This will improve the OCR function when importing icons generated by the NI Icon editor.
Version 2.6
Added quick drop code to allow the user to switch between NI and custom editor.
QD_Swap Icon Editor.vi and support folders will be placed in the LabVIEW quick drop folder
..\National Instruments\LabVIEW 20XX\resource\dialog\QuickDrop
To switch LabVIEW to a custom icon editor that uses the lv_icon.vi set a shortcut key to call the QD_Swap Icon Editor.vi. Ctrl-Space Ctrl-<<assigned letter key>>
To switch LabVIEW to the NI icon editor that uses the lv_icon.lvlibp use the same shortcut key with the Shift key
Ctrl-Space Ctrl-Shift-<<assigned letter key>>
Version 2.5
Fixed install bug where lv_icon.lvlibp was not being renamed after LV 2016
2.5 was set to 2017 or later.
Instructions:
LV 2017 to LV2020 + Ver 2.7 +
Here is the intended process.
- Download package from LAVA
-
Install Package
- Package will install MB icon editor files
- Package will install QD_Swap Icon Editor.vi in the QD plugins folder
- Package will copy the lv_icon.lvlibp And rename it to COPY_ lv_icon.lvlibp
- Package will delete the lv_icon.lvlibp
- Popup will show stating you are using the custom editor.
- Open LV
- Open QD, click configure and select the Ctrl-Key Shortcut Tab at the top
-
Assign a control key to the QD_Swap Icon Editor and click OKWhen you select Ctrl-Space Ctr-<<Assigned Key>> the QD vi will setup the IDE to use my custom editor.
- The vi will verify there is a copy of the lv_icon.lvlibp And if not create it.
- The vi will delete the lv_icon.lvlibp From the ..\National Instruments\LabVIEW 20XX\resource\plugins folder
-
When you select Ctrl-Space Ctr-Shift-<<Assigned Key>> the QD vi will setup the IDE to use the NI editor.
- The vi will copy the COPY_lv_icon.lvlibp and rename the copy to lv_icon.lvlibp
LabVIEW will use the lv_icon.lvlibp If it sees it in the plugins folder. If it does not see the lv_icon.lvlibp It will call the lv_icon.vi which is the name of my icon editor.
LV 2010 to LV 2016 Ver 2.4
Install using JKI VI Package Manager
LV 2009 Ver 2.3
1:Rename the curret LabVIEW 2009 Icon editor LabVIEW 2009\resource\plugins\lv_Icon.vi to a different name so it will not be overwritten.
2: Place the three files (lv_icon.vi, color templates.bin and the folder lv_icon_Subvis) in the LabVIEW 2009\resource\plugins directory.
The next time the icon editor is called LabVIEW will use the lv_icon.vi instead of the standard one.
There is a button on the editor that will allow you to use NI's editor (Old editor not the new one) when a text icon is not desired.
For LabVIEW 8.2 Use the "MB Icon Editor_V2.3_LV82.zip" file
For LabVIEW 8.5 Use the "MB Icon Editor_V2.3_LV85.zip" file
For LabVIEW 8.6 Use The "MB Icon Editor_V2.3_LV8.6.zip" file
What's New in Version 2.3.0 See changelog
Released
- 1: Icon Sizing and Positioning: Now Icons to be sized smaller than 32x32 by changing the “Rows” and “Width” controls. The icon can then be positioned using the “Position” control. My thanks to tcplomp for the Idea.
- 2: Static or Auto sizing Icons: If the “Icon Sizing selector is set the Static the icon will only draw the number of row indicated by the “Rows” control. If the selector is set to Auto the icon will adapt to the minimum number of text lines filled in.
- 3: Selectable Header: The icon header can be removed or enabled by changing the state of the “Header” checkbox.
- 4: Header and Sizing Information Saved: The header and sizing information are now save in the template files and are displayed at the bottom in the “History” array. The sizing and header settings are shown in the icon text of each template icon the when room allows. The history array now saves the last 50 icon templates to the template file
- 5: Color Picker Will Save Current Color in History: To get the color picker to save a new color in the color history array click on the “Current Color” box and it will be added the color history.
- 6: Improved Text Fitting: Text fitting inside the icon has been improved
- 7: Improved Text Recognition: Text recognition of the icon characters had been improved
- 8: Other Improvments: all key presses are ignored until the icon is created and text is in the string controls.
