LabVIEW IDE
Code that assist in programming or enhances in someway the LabVIEW Development environment.
17 files
-
Mark Balla's Icon Editor V2.7>= LV2017
By Mark Balla
Mark Balla Icon editor V2.7
December 2020
Author: Mark Balla
Description:
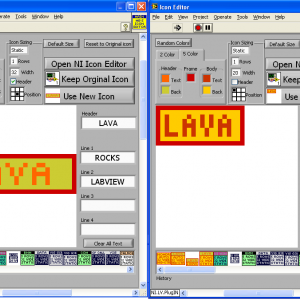
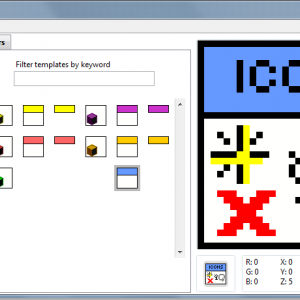
This is a text based vi icon editor
The purpose is to help quickly create text base icons.
The editor can be used in place of the standard NI icon editor or as a stand alone vi. see instructions.
Version 2.7
Updated font table to recognize the standard "Small Font" letters used by the NI icon editor. This will improve the OCR function when importing icons generated by the NI Icon editor.
Version 2.6
Added quick drop code to allow the user to switch between NI and custom editor.
QD_Swap Icon Editor.vi and support folders will be placed in the LabVIEW quick drop folder
..\National Instruments\LabVIEW 20XX\resource\dialog\QuickDrop
To switch LabVIEW to a custom icon editor that uses the lv_icon.vi set a shortcut key to call the QD_Swap Icon Editor.vi. Ctrl-Space Ctrl-<<assigned letter key>>
To switch LabVIEW to the NI icon editor that uses the lv_icon.lvlibp use the same shortcut key with the Shift key
Ctrl-Space Ctrl-Shift-<<assigned letter key>>
Version 2.5
Fixed install bug where lv_icon.lvlibp was not being renamed after LV 2016
2.5 was set to 2017 or later.
Instructions:
LV 2017 to LV2020 + Ver 2.7 +
Here is the intended process.
Download package from LAVA Install Package Package will install MB icon editor files Package will install QD_Swap Icon Editor.vi in the QD plugins folder Package will copy the lv_icon.lvlibp And rename it to COPY_ lv_icon.lvlibp Package will delete the lv_icon.lvlibp Popup will show stating you are using the custom editor. Open LV Open QD, click configure and select the Ctrl-Key Shortcut Tab at the top Assign a control key to the QD_Swap Icon Editor and click OKWhen you select Ctrl-Space Ctr-<<Assigned Key>> the QD vi will setup the IDE to use my custom editor. The vi will verify there is a copy of the lv_icon.lvlibp And if not create it. The vi will delete the lv_icon.lvlibp From the ..\National Instruments\LabVIEW 20XX\resource\plugins folder When you select Ctrl-Space Ctr-Shift-<<Assigned Key>> the QD vi will setup the IDE to use the NI editor. The vi will copy the COPY_lv_icon.lvlibp and rename the copy to lv_icon.lvlibp LabVIEW will use the lv_icon.lvlibp If it sees it in the plugins folder. If it does not see the lv_icon.lvlibp It will call the lv_icon.vi which is the name of my icon editor.
LV 2010 to LV 2016 Ver 2.4
Install using JKI VI Package Manager
LV 2009 Ver 2.3
1:Rename the curret LabVIEW 2009 Icon editor LabVIEW 2009\resource\plugins\lv_Icon.vi to a different name so it will not be overwritten.
2: Place the three files (lv_icon.vi, color templates.bin and the folder lv_icon_Subvis) in the LabVIEW 2009\resource\plugins directory.
The next time the icon editor is called LabVIEW will use the lv_icon.vi instead of the standard one.
There is a button on the editor that will allow you to use NI's editor (Old editor not the new one) when a text icon is not desired.
For LabVIEW 8.2 Use the "MB Icon Editor_V2.3_LV82.zip" file
For LabVIEW 8.5 Use the "MB Icon Editor_V2.3_LV85.zip" file
For LabVIEW 8.6 Use The "MB Icon Editor_V2.3_LV8.6.zip" file
4,710 downloads
Updated
-
LabVIEW Task Manager (LVTM)
By TimVargo
LabVIEW Task Manager v1.10.0 (for LV2013+)
This code is Open-Source, and free of charge
Authors: Ravi Beniwal, Tim Vargo
LabVIEW Versions Supported:
LabVIEW Versions Tested on:
Dependencies:
GPower Error & Warning = 1.2.0.14 lava_lib_tree_control_api >= 1.0.1-1 NI SmartBalloon = 2.0.0.2 OpenG Application Control Library >= 4.1.0.7 OpenG Comparison Library >= 4.0.0.3 OpenG Array Library >= 4.1.1.14 OpenG Error Library >= 4.2.0.23 OpenG File Library >= 4.0.1.22 OpenG LabVIEW Data Library >= 4.2.0.21 OpenG String Library >= 4.1.0.12 LAVA Palette >= 1.0.0.1 Description:
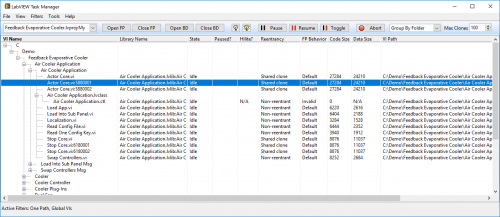
LabVIEW Task Manager is a debugging tool for use during LabVIEW code development. An expandable/collapsible tree diagram displays detailed information (both static and dynamic) on all VIs in memory, belonging to a selected project/target. It allows for interacting with single or multiple selected VIs at a time, and includes the following major features:
Selection of project/target Lists all VIs in memory, grouped by class/library or disk folder, or a flat list Searches for and enumerates clones in memory DropIn VI for including dynamically referenced clones (Clone Beacon) 'Refresh Now' (F5) re-reads all VIs in memory and adds new ones to the tree Displays VI name, owning class/library, state, path, data size & code size Displays VI FP Behavior, Reentrant?, Reentrancy Type, Paused? & Highlight? Group by Class/Library or Folder, or display a Flat List Sort by any column, ascending or descending Filter out item types vi, ctl, and vit/ctt Filter out vi.lib and global VIs Filter out items from being displayed, per folder paths. Tracking of, and ability to toggle, execution highlighting on multiple selected VIs Tracking of paused VIs with ability to Pause/Resume/TogglePause multiple selected VIs DropIn VI for pausing only while debugging If a clone initiates a pause, a different pause symbol is used for all clones of that same reentrant original VI Select multiple VIs and open or close their FPs or BDs Double Click a VI from the tree to bring the BD (first choice) or FP to front, if already open Select multiple top-level VIs and Abort them Remotely close any VI's Front Panel Installation and instructions:
Known Issues:
Cannot abort SubVIs launched from remote VI Server or local Asynch Call By Ref3,653 downloads
Updated
-
Open Office RGT addon
Public Git repo (source code):
https://bitbucket.org/normandinf/openofficergt
====================================
Open Office RGT addon v0.2.0 beta
Copyright © 2010-2016, François Normandin.
All rights reserved.
Author:François Normandin
Contact Info: Contact via PM on www.lavag.org
LabVIEW Versions:
Created and tested with LabVIEW 2009
Dependencies:
Report Generation toolkit (part of it is included in the base package: Word & Excel require license)
Description:
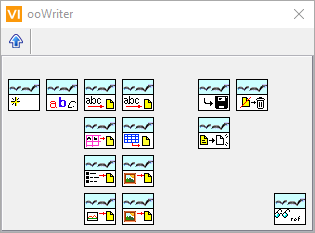
This package contains an installer and class to use the AODL (An OpenDocument library) with the Report Generation toolkit
from National Instruments.
Includes:
- ooWriter class
- AODL classes (and DLLs)
- PreInstall and PreUninstall VIs to backup the only modified NI VI: New Report.vi (in Utility\NIReport.llb)
Instructions:
After installing package with VIPM, use the NI Report Generation palette as usual.
Known Issues:
1- ooWriter:
Styles integration is incomplete. Needs to have a real "style" class created that will comply with current standard in RGT.
Adding an image is not working correctly: it is embedded in a paragraph instead of being standalone.
2- ooCalc: no integration yet, but rather similar to ooWriter in principle. (All the roadblocks will be cleared by ooWriter)
3- This code has been done with LV2009. I see no problem for using with LV 8.2 and up, it's just a matter of
saving for previous version and distribute. This will be done at a later date.
Acknowledgements:
National Instruments. (NI Report Generation Toolkit) ** LVOOP rocks **
AODL by Sun Microsystems, Inc. Copyright 2007
History:
v0.2.0: released on bitbucket (Git) for community
v0.1.0: Initial release of the code. (LV2009)
License:
LabVIEW libraries of OpenOffice for RGT addon are licensed under BSD.
AODL us distributed under the LGPL license.
(see license files for more detail)
Support:
If you have any problems with this code or want to suggest features:
please go to www.lavag.org and Navigate to the discussion page.
Distribution:
This code was downloaded from the LAVA Code Repository found at www.lavag.org
============================
3,784 downloads
Updated
-
VI Organizer
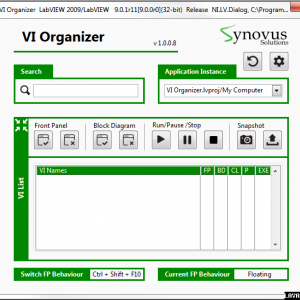
VI Organizer is a LabVIEW toolkit that helps LabVIEW developers access and control their working VI more conveniently. While having basic functions like opening or closing VIs in memory, VI Organizer can also help the user do more advanced tasks like reopening VIs according a snapshot the user stored recently. VI Organizer provides an easy to use UI and small footprint on the screen.
Here is a summary of main functions in VI Organizer:
1. List all VIs in an application instance
2. Quickly search VI by name
3. Open/Close selected VIs' FP/BD
4. Run/Pause/Stop selected VIs
5. Run Modal over other modal windows (So the user is able to abort other running modal VIs)
6. Quickly locate top level VIs running in the background including clones.
7. Store the locations of a group of VIs and reopen them at the saved locations.
8. Configurable filtering engine for sorting the VIs.
Suggestions and bug reports are appreciated. We would like to provide a better programming environment for all LabVIEW developers.
443 downloads
Submitted
-
Polymorphic VI Editor v1.0.1 LV2011
By Ton Plomp
Polymorphic VI Editor v1.0.1
Copyright © 2012 Ton Plomp
All rights reserved.
Author: Ton Plomp
LAVA Name: TCPlomp
Contact Info: Contact via PM on lavag.org
LabVIEW Versions:
2009
Dependencies:
OpenG:
oglib_array
oglib_error
oglib_file
oglib_string
JKI:
jki_lib_state_machine
Description:
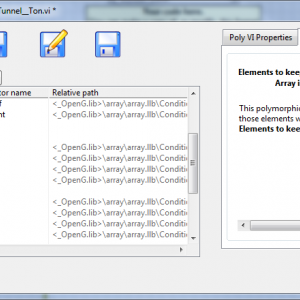
A GUI for easily editing polymorphic VIs and creating good-looking menu trees.
Installation and instructions:
A: Open the ZIP file and install the OGP file with OpenG builder
B: run the 'Polymorphic Editor.vi' in the 'Build' folder
Examples:
Look in the LAVA discussion for this entry for some videos on this tool
<object id="scPlayer" width="1027" height="517"> <param name="movie" value="http://content.screencast.com/users/TonPlomp/folders/Jing/media/389dc546-26c4-499f-8702-0ffea3faf50d/jingswfplayer.swf"></param>'>http://content.screencast.com/users/TonPlomp/folders/Jing/media/389dc546-26c4-499f-8702-0ffea3faf50d/jingswfplayer.swf"></param> <param name="quality" value="high"></param> <param name="bgcolor" value="#FFFFFF"></param> <param name="flashVars" value="thumb=http://content.screencast.com/users/TonPlomp/folders/Jing/media/389dc546-26c4-499f-8702-0ffea3faf50d/FirstFrame.jpg&containerwidth=1027&containerheight=517&content=http://content.screencast.com/users/TonPlomp/folders/Jing/media/389dc546-26c4-499f-8702-0ffea3faf50d/Polymorphic%20Editor.swf"></param> <param name="allowFullScreen" value="true"></param> <param name="scale" value="showall"></param> <param name="allowScriptAccess" value="always"></param> <param name="base" value="http://content.screencast.com/users/TonPlomp/folders/Jing/media/389dc546-26c4-499f-8702-0ffea3faf50d/"></param>'>http://content.screencast.com/users/TonPlomp/folders/Jing/media/389dc546-26c4-499f-8702-0ffea3faf50d/"></param> <embed src="http://content.screencast.com/users/TonPlomp/folders/Jing/media/389dc546-26c4-499f-8702-0ffea3faf50d/jingswfplayer.swf" quality="high" bgcolor="#FFFFFF" width="1027" height="517" type="application/x-shockwave-flash" allowScriptAccess="always" flashVars="thumb=http://content.screencast.com/users/TonPlomp/folders/Jing/media/389dc546-26c4-499f-8702-0ffea3faf50d/FirstFrame.jpg&containerwidth=1027&containerheight=517&content=http://content.screencast.com/users/TonPlomp/folders/Jing/media/389dc546-26c4-499f-8702-0ffea3faf50d/Polymorphic%20Editor.swf" allowFullScreen="true" base="http://content.screencast.com/users/TonPlomp/folders/Jing/media/389dc546-26c4-499f-8702-0ffea3faf50d/" scale="showall"></embed> </object>
Known Issues:
Acknowledgements:
OpenG.org for showing the power of polymorphic VIs
JKI for providing an easy to use State Machine framework
Version History:
v1.0.0: Initial release of the code.
License:
Copyright © 2010, TC Plomp
All rights reserved.
Redistribution and use in source and binary forms, with or without
modification, are permitted provided that the following conditions are met:
1. Redistributions of source code must retain the above copyright
notice, this list of conditions and the following disclaimer.
2. Redistributions in binary form must reproduce the above copyright
notice, this list of conditions and the following disclaimer in the
documentation and/or other materials provided with the distribution.
3. All advertising materials mentioning features or use of this software
must display the following acknowledgement:
This product includes software developed by the <organization>.
4. Neither the name of the <organization> nor the
names of its contributors may be used to endorse or promote products
derived from this software without specific prior written permission.
THIS SOFTWARE IS PROVIDED BY TC Plomp ''AS IS'' AND ANY
EXPRESS OR IMPLIED WARRANTIES, INCLUDING, BUT NOT LIMITED TO, THE IMPLIED
WARRANTIES OF MERCHANTABILITY AND FITNESS FOR A PARTICULAR PURPOSE ARE
DISCLAIMED. IN NO EVENT SHALL TC PLOMP BE LIABLE FOR ANY
DIRECT, INDIRECT, INCIDENTAL, SPECIAL, EXEMPLARY, OR CONSEQUENTIAL DAMAGES
(INCLUDING, BUT NOT LIMITED TO, PROCUREMENT OF SUBSTITUTE GOODS OR SERVICES;
LOSS OF USE, DATA, OR PROFITS; OR BUSINESS INTERRUPTION) HOWEVER CAUSED AND
ON ANY THEORY OF LIABILITY, WHETHER IN CONTRACT, STRICT LIABILITY, OR TORT
(INCLUDING NEGLIGENCE OR OTHERWISE) ARISING IN ANY WAY OUT OF THE USE OF THIS
SOFTWARE, EVEN IF ADVISED OF THE POSSIBILITY OF SUCH DAMAGE.
Distributed under the Creative Commons Attribution 3.0 (http://creativecommo.../about/licenses)
See link for a full description of the license.
Support:
If you have any problems with this code or want to suggest features:
please go to lavag.org and Navigate to LAVA > Resources > Code Repository (Certified) and
search for the "Polymorphic VI Editor" support page.
Distribution:
This code was downloaded from the LAVA Code Repository found at lavag.org
2,211 downloads
Updated
-
Improved LV 2009 icon editor
By PJM_labview
This is a version of the LabVIEW 2009 Icon Editor that has several cosmetic improvements (along with some bug fixes).
Feel free to try it.
Note: The installer does backup the existing icon editor that will be restored (if you were to uninstall this version).
Change Log:
Version 1.7:
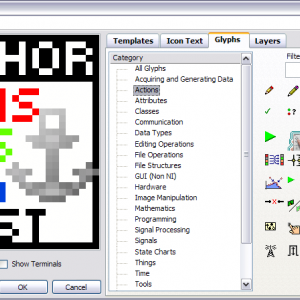
[New Feature] Add a condensed pixel font (called: "Pixel Font: PF1") that allow for longer text to be entered.
[bug Fix] Synchronize the "Edit>>Show Terminal" menu with the "Show Terminal" check box.
[bug Fix] CAR 186982: "[iE] Wrong Icon is loaded in Icon Editor".
Version 1.6:
[New Feature] CTRL Key will show the color picker while the text tool is selected.
[bug Fix] Mouse coordinate drawing in icon was off by (3,3) pixels (the picture control edge thickness).
Version 1.5:
[New Feature] Add a "Merge All User Layers" button.
[New Feature] Optimize glyph display by removing unnecessary blank space between glyphs (went from 6x6 grid to 8x8 grid).
[New Feature] Automatically update the "glyph path string" as the mouse move over the glyphs.
[bug fix] Car 183609: Glyph path string is not reset when a glyph is dropped (or when a new category is selected).
[bug Fix] Scrolling the glyph array should not update the glyph path string.
[bug Fix] "Glyph path string" should not be click-able (disable it).
[Change / Bug Fix] Picking white color (255,255,255) result in grayish (246,246,246) color selected. Now the resulting color is (254,254,254).
Version 1.4:
[Cosmetic Change] Major redesign of the layer control visual aspect.
[bug Fix] The text marker (^) is hidden behind other objects.
[bug Fix] CAR 182992 File save (template or glyph) failed if the hierarchy has folder with a dot in its name.
[bug Fix] Flush glyph filter when changing glyph category.
[New Feature] Glyph filter works only on the visible category and does not reset the category to all anymore.
Version 1.3:
[bug Fix] Selection and glyph drop was broken in the original IE.
[bug Fix] If you paste text into an empty line, the icon is not updated.
[bug Fix] If you paste text into an non empty line (while the content is selected) the clipboard content is append to the selected existing content (the existing selected content should be wiped out).
CAR 182828: Manual User Input always cancels even when ok is pressed.
Version 1.2:
[New Feature] This package does stop the IE if it is running prior to installing it.
[New Feature] This package does compiled the IE after installation.
[New Feature] This package does backup the existing Icon Editor prior to install the new one.
[New Feature] This package does restore the previously installed IE upon un-installation.
[New Feature] This package also include the original IE UI in LVrootresourcepluginsOriginal lv_icon.vi (rename it to lv_icon.vi to use it).
[NI Bug Fixes]
151661 - This change fixes the copy/cut ability of the icon. If a region is selected and/or a layer is selected, copy and cut is enabled.
161032 - No limit on arrow keys moving text
175010 - When moving a selection and changing a layer, the operation is performed on the new layer
179582 - Glyph layer moves after deleting a selection (first edit to the layer)
179799 - If the bottom layer got deleted, the user layers list is not updated properly
179392 - Icon editor open on secondary screen when working with two screens
179000 - Switching the tab doesn't actually unselect the layer
179001 - CTRL - A followed by pressing the delete key doesn't delete all selected layers
179007 - The key binding is messed up. The mirror tool has set as the toggle key, whereas the OK button should have to set the focus.
179179 - Control activates dropper and not the move tool when pasting an image
180161 - It is possible that multiple icon layers are copied in reverse order and neither template nor text layer are considered at all
182276 - Icon glyphs do not handle standard transparency
Version 1.1:
UI Reorganization (toolbar on the left among other things) [Note: This required code changed since the existing code was relying on hard coded constants].
Edit the color selector double arrow (/|->) to remove unsightly pixel and add transparency.
Conform to UI design by using system color in the background instead of white.
Add a system frame (from a string control background) to the icon image (instead of the round decoration) [Note: this may not be too great on Mac or Linux]
Hide glyph scrollbars when not needed.
Edit the layer "eye" to use alpha transparency (not so great result as it is, but I think it is better).
Edit the layer preview by adding a system frame around it (from a string control background).
Add a "Show Terminals" check box on the panel for quick access (similar to the previous icon editor).
Change the icon preview so it is rendered in 8-bit (instead of 24-bit).
You will need VI Package Manager to install the modified icon editor.
PJM
6,135 downloads
Updated
-
FP SubVI Fixer ver 6 LV 2009
By Mark Balla
Author: Mark Balla
LAVA Name: mballa
Contact Info: Contact via PM on lavag.org
LabVIEW Versions:
LabVIEW 8.2, 8.5, 8.6, 2009
Dependencies:
None
Description:
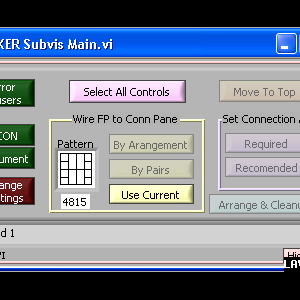
The FP SubVI Fixer is a set of VI Server and Scripting function that will automatically wire the FP controls and indicators
to the connector pane and will arrange the FP items based on a configuration setting.
Past Deveopment of this tool can be found here
Installation and instructions:
Place the three items (FP FIX SUBVI, _FIXER Subvis Main, _Subvis for FIXER) in the
\National Instruments\Labview 8.x\project folder
In the LabVIEW development environment open a vi that needs it front panel fixed. select tools then the FP FIX SUBVI item.
the fixer will popup breifly and then be minimized.
Select the vi to be fixed.
Press Ctrl-Shift-Space to bring up the FP Sub VI Fixer.
Click on the various buttons to fixe the subvis front panel.
Examples:
Please view the following screencast videos to see how it works.
Acknowledgements:
Thanks to Aristos Queue and PJM_labview for helping me take this to the next level.
Version History:
v6.0.0: Initial release of the code.
1 Using the by arrangement function
http://www.screencas...cc-235e8cca0cd1
2 Using Settings
http://www.screencas...3b-37fe090f1eb0
3 Using the by Pairs function
http://www.screencas...34-47266a6860a3
3,061 downloads
Updated
-
Abort VI
By jcarmody
Abort.vi v1.0.0
Copyright @ 2009, Jim Carmody
All rights reserved.
Author: Jim Carmody
LAVA name: jcarmody
Contact Info: Contact via PM on www.lavag.org
LabVIEW version:
Created and tested with LabVIEW 8.2
Dependencies:
LabVIEW 8.2 or higher
Description:
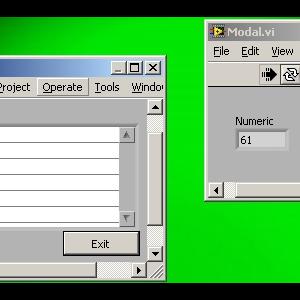
Sometimes it happens that you're running a modal VI, you can't stop it and the only option you have to recover is to kill the LabVIEW process and start over. Running this VI will present a list (on top of your other modal VI) of all VIs running in all contexts (except NI.* and JKI.*). Select the one giving you trouble and this VI will abort it. Keep this VI handy and you'll never be stuck again.
Instructions:
*NOTE* This VI needs to be set to "Run when opened"; I purposely didn't set it for submission here because I think it's impolite. Take a look at the Block Diagram, satisfy yourself that it's safe (here be dragons, rusty nails and all), set the execution to run when opened, put the VI where it'll be handy and commence developing code secure in the knowledge that a UI mistake won't lock your LabVIEW process.
Known Issues:
None
Acknowledgements:
This program was inspired by this thread in the NI forum.
Change Log:
v1.0.0: Initial release of the code.
License:
BSD
Support:
If you have any problems with this code or want to suggest features:
please go to www.lavag.org and Navigate to
LAVA > Resources > Code Repository (Certified) and
search for the "Abort.vi" support page.
Distribution:
This code was downloaded from the LAVA Code Repository found at www.lavag.org
4,138 downloads
Updated
-
Icons
By jgcode
Icons v1.0.0-1
Copyright © 2009, Jonathon Green; JGCODE
All rights reserved.
Author: Jonathon Green
LAVA Name: jgcode
Contact Info: Contact via PM on lavag.org
LabVIEW Versions:
LabVIEW 2009
Dependencies:
No dependencies
Description:
Discussion contains video demonstration
Installs a range of icons to the LabVIEW Data Directory folder (osdatadir) for use with the LabVIEW 2009 Icon Editor. Icons include icon templates, LVOOP banner and object icons and commonly used glyphs.
The LabVIEW Data Directory (osdatadir), by default, is located at C:\Users\(User Name)\Documents\LabVIEW Data for Windows Vista and Windows 7 and C:\Documents and Settings\(User Name)\My Documents\LabVIEW Data for Windows XP.
LabVIEW 2009, by default, stores Glyphs in the (osdatadir)\Glyphs folder and icon templates in the (osdatadir)\Icon Templates folder.
For this package the installation locations are sub folders within these folders:
Commonly used glyphs - (osdatadir)\Glyphs\_glyphs
LVOOP Templates - (osdatadir)\Icon Templates\_lvoop icons
Icon Templates - (osdatadir)\Icon Templates\_template icons
An underscore is used to alphabetically rank the folders, moving them to the top of the list in the LabVIEW Icon Editor.
Menu items are also installed for LabVIEW under File >> Icons to open the default folder locations from LabVIEW.
Menu selections include:
File >> Icons >> Template Icons - opens the (osdatadir)\Icon Templates folder
File >> Icons >> Glyphs - opens the (osdatadir)\Glyphs folder
This is makes it easy to open and browse all images from LabVIEW. Menu items are installed under (LabVIEW)\Wizard\Icons folder.
Installation and instructions:
Install package using VIPM.
Restart LabVIEW for the Menu Items to take effect.
Examples:
Open the Icon Editor to view the installed icons
Browsw the File >> Icons menu item to open the folder locations from LabVIEW.
Known Issues:
Due to no support for osdatadir in VIPM and OGPB and the fact that this location is not LabVIEW Versioned, the user should only install the package in one version of LabVIEW. (As of LabVIEW 2009, this is the only option).
Acknowledgements:
OpenG
ICON Technologies
Version History (Changelist):
1.0.0-1 2009 12 05
[New] Initial release of the code (LabVIEW 2009)
License:
Copyright © 2009, Jonathon Green
All rights reserved.
Redistribution and use in source and binary forms, with or without
modification, are permitted provided that the following conditions are met:
* Redistributions of source code must retain the above copyright
notice, this list of conditions and the following disclaimer.
* Redistributions in binary form must reproduce the above copyright
notice, this list of conditions and the following disclaimer in the
documentation and/or other materials provided with the distribution.
* Neither the name of the <organization> nor the
names of its contributors may be used to endorse or promote products
derived from this software without specific prior written permission.
THIS SOFTWARE IS PROVIDED BY <copyright holder> ''AS IS'' AND ANY
EXPRESS OR IMPLIED WARRANTIES, INCLUDING, BUT NOT LIMITED TO, THE IMPLIED
WARRANTIES OF MERCHANTABILITY AND FITNESS FOR A PARTICULAR PURPOSE ARE
DISCLAIMED. IN NO EVENT SHALL <copyright holder> BE LIABLE FOR ANY
DIRECT, INDIRECT, INCIDENTAL, SPECIAL, EXEMPLARY, OR CONSEQUENTIAL DAMAGES
(INCLUDING, BUT NOT LIMITED TO, PROCUREMENT OF SUBSTITUTE GOODS OR SERVICES;
LOSS OF USE, DATA, OR PROFITS; OR BUSINESS INTERRUPTION) HOWEVER CAUSED AND
ON ANY THEORY OF LIABILITY, WHETHER IN CONTRACT, STRICT LIABILITY, OR TORT
(INCLUDING NEGLIGENCE OR OTHERWISE) ARISING IN ANY WAY OUT OF THE USE OF THIS
SOFTWARE, EVEN IF ADVISED OF THE POSSIBILITY OF SUCH DAMAGE.
Support:
If you have any problems with this code or want to suggest features:
please go to lavag.org and Navigate to LAVA > Resources > Code Repository (Certified) and search for the LVOOP Custom User Scripting support page.
Distribution:
This code was downloaded from the LAVA Code Repository found at lavag.org
2,817 downloads
Updated
-
Generate Palettes
By gb119
Generate Palettes-1.0.0.04.zip
~~~~~~~~~~~~~~~~~~~~~~~~~~
Copyright © 2007-2009, University of Leeds, UK
All rights reserved.
Author:
Gavin Burnell
G.Burnell@leeds.ac.uk
Distribution:
This code was downloaded from the LAVA Code Repository: http://lavag.org/index.php?app=downloads
Description:
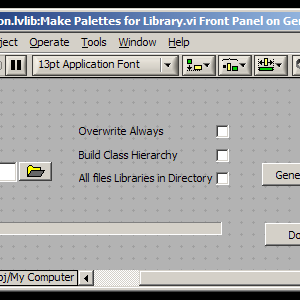
This is a utility for automatically creating palette menu files from a library or LabVIEW class.
LabVIEW offers the option of including palette files in .lvlib or .lvclass files and for setting one of these palettes to be the default palette file when the user right-clicks by a member vi or class wire. This is very useful, but the LabVIEW project manager has some flaws when it comes to
having multiple palette files with the same name in a project that can easily result in a corrupt xml file. This utility gets around this problem by creating uniquely named palette files that reflect the project structure of the class or library.
In the case of class files, if the class is a child class the utility will attempt to lcoate a palette file for the parent class. This makes it easier to have all parent methods readily to hand when right clicking on a class wire. Couple with the option to work out the complete class parentage and create all necessary palettes it is quite easy to setup a chain of palettes through a long descendent list of classes.
Todo:
I've got various ideas to implement in future versions:
1) Look for gone away or moved items in the palette files and attempt to relocate them.
2) See if I can access Endevo Goop Developer class properties to use different icons for public/private/protected class folders.
3) LabVIEW project file support (should be quite easy to find all class, library files within a project)
Dependancies:
OpenG File Tools
Support:
If you have any problems with this code or want to suggest features:
<LAVAG forum here>
h
Change Log:
1.0.04 Fixed silly bug where default palette was set after the library was saved. Sorted out relative paths somemore.
1.0.03 Added code to set default palette file (thanks to Ton Plomp !) and move refresh palettes to only run once.
1.0.02 Added some more documentation to the sub-vis.
1.0.01 Original release
License:
Copyright © 2007-2009, University of Leeds
All rights reserved.
Redistribution and use in source and binary forms, with or without modification, are permitted provided that the following conditions are met:
* Redistributions of source code must retain the above copyright notice, this list of conditions and the following disclaimer.
* Redistributions in binary form must reproduce the above copyright notice, this list of conditions and the following disclaimer in the documentation and/or other materials provided with the distribution.
* Neither the name of the University of Leeds nor the names of its contributors may be used to endorse or promote products derived from this software without specific prior written permission.
THIS SOFTWARE IS PROVIDED BY THE COPYRIGHT HOLDERS AND CONTRIBUTORS
"AS IS" AND ANY EXPRESS OR IMPLIED WARRANTIES, INCLUDING, BUT NOT
LIMITED TO, THE IMPLIED WARRANTIES OF MERCHANTABILITY AND FITNESS FOR
A PARTICULAR PURPOSE ARE DISCLAIMED. IN NO EVENT SHALL THE COPYRIGHT OWNER OR
CONTRIBUTORS BE LIABLE FOR ANY DIRECT, INDIRECT, INCIDENTAL, SPECIAL,
EXEMPLARY, OR CONSEQUENTIAL DAMAGES (INCLUDING, BUT NOT LIMITED TO,
PROCUREMENT OF SUBSTITUTE GOODS OR SERVICES; LOSS OF USE, DATA, OR
PROFITS; OR BUSINESS INTERRUPTION) HOWEVER CAUSED AND ON ANY THEORY OF
LIABILITY, WHETHER IN CONTRACT, STRICT LIABILITY, OR TORT (INCLUDING
NEGLIGENCE OR OTHERWISE) ARISING IN ANY WAY OUT OF THE USE OF THIS
SOFTWARE, EVEN IF ADVISED OF THE POSSIBILITY OF SUCH DAMAGE.
1,552 downloads
Updated
-

Controls to Variant
By Bobillier
Copyright © 2007, ERIC BOBILLIER
All rights reserved.
ERIC BOBILLIER.
Author:
ERIC BOBILLIER
--see readme file for contact information
Description:
This Vi creat a initialise variant controls from selected controls.
You creat a array of variant if there is more one controls selected.
You have the choice between array of variant or array of cluster (Name and Variant Data).
If you paste it in front panel it's control, and if in diagram it's constant.
If you select "Not array If lonely" a single control is convert in variant
(array with one value inother case).
This tools run with Vis and Globals
If you Hold Alt Key down during running , the selected controls are convert
in Variant array (or cluster array) directely in source Vi.
This option run with Vi only.
How use this tool:
First :select control (s) in a Vi
Second : Select kind of variant control you want creat.
Third : Run this Vi (with or without alt Key down)
Fourth: Paste control in you destination Vi.(if Alt Key unused)
Test on Labview 7.0 and XP
Change Log:
1.0.0: Initial release of the code.
668 downloads
Submitted
-

RTM to Enum
By Bobillier
RTM to Enum V1.0.0
Copyright © 2007, ERIC BOBILLIER
All rights reserved.
ERIC BOBILLIER.
Author:
ERIC BOBILLIER
--see readme file for contact information
Description:
This Vi creat an enum control(orindicator or constant)from a Real Time Menu (.rtm files) data files.
You can also choose from Tag or Name Data ,and select the destination of creation between clipboard or
enum.Vi (place on desktop).
I have add a second tool, call Enum to tree who show RTM data in tree control .
Test on Labview 7.0 and XP (for other OS you must modify the Desktop Path .Vi)
Uses the following OpenG packages:
oglib_file-2.7-1
To get these OpenG packages use VIPM (http://jkisoft.com/vipm/)
Change Log:
1.0.0: Initial release of the code.
897 downloads
Updated
-

Virtual Logic Analyzer
Virtual Logic Analyzer
Copyright © 2007, Richard Jennings
All rights reserved.
Richard Jennings
Author:
Richard Jennings
--see readme file for contact information
Description:
The Virtual Logic Analyzer is a development tool for monitoring VI execution. It is especially useful for optimizing the performance of multi-threaded, parallel applications. Monitoring Data and Timing information over an entire application can provide unexpected insight into performance bottlenecks. The VLA Probes use the OOP model Stepan Riha of NI introduced at NIWeek 97 and the Virtual Logic Analyzer concept is based on the presentation "Monitoring the Control and Timing of VIs" by Dana Redington at NIWeek95.
There are two parts to the Virtual Logic Analyzer: Probes, and the GUI interface. Probes are meant to be as efficient as possible, but do not place them in a MHz type loop. Instead place them in strategic locations where you can monitor program flow. Each VLA Probe is a reentrant vi that monitors your program's execution by timestamping data during program execution. Simply place this vi on your block diagram and connect the required Tag and Data inputs. Remember that dataflow governs LabVIEW execution. Be sure to give each Probe a unique Tag.
Probes can be on a local or remote machine. Because Probes are OFF by default they can be left in an application and individually switched on or off later with the GUI application. To view and interact with the probes run the Virtual Logic Analyzer application.
Instructions:
This demo contains three asynchronous parallel loops. Two of the loops are enclosed in SubVIs. Inside each loop is a Virtual Logic Analyzer (VLA) Probe to monitor execution. Each VLA Probe is a reentrant vi that monitors your program's execution by timestamping data during program execution. Simply place this vi on your block diagram and connect the required Tag and Data inputs. Be sure to give each Probe a unique Tag. Probes can be on a local or remote machine. Because Probes are OFF by default they can be left in an application and individually switched on or off later with the GUI application. To view and interact with the probes run the Virtual Logic Analyzer application.
The first time each Probe is called a unique reference is created by the VLA Create Probe.vi and an entry is made in the VLA Probe Registry.vi. Each probe entry contains information about the probe, its caller(s), and a queue reference for probe data storage. Probe data is stored in a queue for speed and memory efficiency.
Although a probe will automatically create a reference the first time it is run, NO data is stored until the probe is turned on from the VLA application. This allows probes to be placed throughout an application and turned on and offf at will. Data collected by each Probe includes the call chain, priority, and execution system of the calling VI. Use this information along with the execution timing information to optimize execution on multi-threaded, multi-processor applications.
This VLA Probe uses the OOP model Stepan Riha of NI introduced at NIWeek 97 and the Virtual Logic Analyzer concept is based on the presentation "Monitoring the Control and Timing of VIs" by Dana Redington at NIWeek95.
Change Log:
0.9.0 First public release
0.9.1 GUI enhancements
1,830 downloads
Submitted
-

IBB Frontpanel Tool
By i2dx
Author:
Christian Berger
--see readme file for contact information
Description
1. What is this tool good for?
This tool was made to set front panel properties in LabVIEW 8.20 programmatically. You can define in a text-comment how the front panel should look like, place this comment in the block-diagram and let the tool do the rest
2. Why was this tool made?
I have created this tool, for one main reason:
Sometimes it's annoying to debug running code, if you have dialogs with the FP properties "open when called" and "modal" set. With this tool you can define, how the FP should look like at runtime, e.g. in your compiled release, and work with the default VI front panel appearance during the development.
3. How to install and use this tool?
just drop the ibbfptool.llb into your \project directory, restart LabVIEW and use the "Frontpanel Tool" entry from the "tools" palette.
4. How is this working?
just create a text comment on the block-diagram which must have the following format:
First Line: WINDOW APPEARANCE
n++ Line(s):
SetPanes2Zero={TRUE | FALSE} - Set Origin of all Panes to 0:0?
TitleBarVisible={TRUE | FALSE} - Window has title bar?
MenuBar={TRUE | FALSE} - Show menu bar?
vScrollBar={TRUE | FALSE} - Show vertical scroll bar?
hScrollBar={TRUE | FALSE} - Show horizontal scroll bar?
ToolBar={TRUE | FALSE} - Show toolbar when running?
AbortBtn={TRUE | FALSE} - Show Abort button?
RunBtn={TRUE | FALSE} - Show Run button?
ContRunBtn={TRUE | FALSE} - Show Run Continuously button?
ShowWhenCalled={TRUE | FALSE} - Show front panel when called?
CloseAfterCall={TRUE | FALSE} - Close afterwards if originally closed?
ShowWhenLoaded={TRUE | FALSE} - Show front panel when loaded?
Behaviour={1..4} - Window behaviour: 1=default, 2=floating 3=floating & auto hide, 4=modal
RunTransparently={TRUE | FALSE} - Window runs transparently?
transparency={0..100} - Transparency: from 0 to 100 [maybe no good idea?]
Closeable={TRUE | FALSE} - Allow user to close window?
Resizeable={TRUE | FALSE} - Allow user to resize window?
Minimizeable={TRUE | FALSE} - Allow user to minimize window?
RunTimeShortCutMenus={TRUE | FALSE} - Allow default run-time shortcut menus?
HiliteReturnButton={TRUE | FALSE} - Highlight Boolean
for example:
WINDOW APPEARANCE
SetPanes2Zero=TRUE
TitleBarVisible=TRUE
MenuBar=TRUE
vScrollBar=FALSE
hScrollBar=FALSE
ToolBar=FALSE
which would set the properties, when you run the tool.
The Properties NOT mentioned in the text are set to DEFAULT Properties!
5. create (own) Shortcuts and modify the code
This tool has already built in 2 Shortcuts:
WINDOW APPEARANCE
DIALOG
which sets the FP Appearance to LV Dialog default
and
WINDOW APPEARANCE
STANDARD
which sets the FP Appearance to LV default
You can create your own shortcuts, if you want/need to:
Open the VI IBBTools_Search FP Behaviour Desc.vi and add a case after "DIALOG" and set the properties according to your needs.
6. how do I use that tool?
Run the tool from the Tools palette, select the TOP LEVEL VI and choose "set" or "unset", the tool will go down the COMPLETE VI HIERARCHY and set the FP Properties for every VI, where it can find a valid "WINDOW APPEARANCE" comment.
Use the "set" / "unset" checkbox to choose whether to SET the Properties as described in the comment or UNSET the properties, which means, that the Window appearance is set to LabVIEW default Window Appearance.
There are 2 example VIs (testVI.vi and 2ndtestVI.vi) where you can check this out!
1,297 downloads
Submitted
-

Vi, Vit, Ctl Icon and Description Editor
RUAG ICON Editor v1.7 - 14.11.2006
Copyright © 2006, Martin Hasler
----------------------
This is the currend RUAG ICON Editor for LabVIEW 8.x
Have a lot of Fun with LabVIEW
Author:
Martin.Hasler
--see readme file for contact information
Description:
Copy the Files Icon.llb and RUAG-Icon-Editor.vi and description.txt into your LabVIEW 8.x/project/ Directory
If you start LabVIEW the next Time, the RUAG-ICON-Editor appears under LabVIEW Tools (Werkzeuge).
With the RUAG Icon Editor you can create or modify ICONS from Vi, Vit, Ctl.
The information about the ICON will be saved into the VI-Documentation.
=> First: Click "Load Directory"
=> Click "Tree-Control" to choose your VI to modify.
=> You can modify the colorsets by Editing the Color_Set.vi in the Icon.llb. Do not forget to click on: Save current values as default.
=> DO NOT USE THE FOLLOWING SINGN IN THE TITLE OR BODY!! §
=> Dobble -click your VI in the "Tree-Control" to open the VI.
Version History:
V1.0 The Original Version 1 was made by Pascal Helfenstein phelfens@fhzh.ch
V1.1 You can reload the old Icon.
You can Choose Color Sets.
Help button.
Changes will be saved into the VI documentation.
V1.2 You can Edit Icons in llb
You can Edit Icons from *.vit, *.ctl, *.vi
V1.3 The Pictures (New Icon, Old Icon etc.) are bigger
Bug Fixed that you have to press "Write Icon" twice for Vi's which are in a Project.
V1.4 More Documentation, (BD & FP) "Straighten the Code"
V1.5 "Edit Documentation" included
V1.5.1 Rearranged all Buttons. If you edit the Icon the first time, text=black, Title and Body= white
V1.5.2 If you edit a ICON the first time, a line feed will be added to the existing documentation.
V1.6 If the entered ICON text is too long it will be cutted automatically.
Automatically add and remove Tags < B > and </B> to the Description. (Preview included)
Rearranged Buttons
V1.7 An Indicator is blinking and the cursor is set to busy while the tree control is updated
Bug solved with old tree control paths
Automatically generate a Documentation with Username, Date, CTL Inputs and Outputs if they are connected to the connector pane (including their description)
Open Frontpannel and Blockdiagramm by right-click to the Tree CTL or LLB-Content
1,608 downloads
Submitted
-

Project Copy Tool
By i2dx
Project Copy Tool (LV 8.0.x) V1.3.2
Copyright © 2006, i2dx
All rights reserved.
Author:
i2dx
--see readme file for contact information.
Description::
Purpose: copy a complete VI-Hierarchy of a Project to a new directory starting with the TopLevel VI ...
it works quite good with my projects, and i hope you will find it usefull. please report bugs, if you use it!
Features:
it builds the complete vi-hierarchy starting at the top-level vi
it extracts VIs which are bound to lvlibs when copying to the new folder
it replaces Project - prefixes (i work with project prefixes ...) eg. BMW_MTestV1_Main.vi --> NewProjectPrefix_Main.vi
drawbacks:
it does create lvlibs
it does not create lvproject files
the workaround for the drawbacks are 2 mouseclicks in the project explorer window, so I avoid the work right now ...
known issues:
if you have bound an vi to a lvlib, which does not longer exist, LabVIEW will force you to search the vi --> probably you have to press the "Ignore" butten very often
usage:
copy it to your project directory and call it from the tools-menu with "duplicate project ..."
Version History:
1.0.0:
Initial release of the code.
1,309 downloads
Submitted
-

JKI Fast Mass Compile Tool
By Jim Kring
Copyright © 2006, James Kring, Inc.
All rights reserved.
Author:
James Kring
james.kring@jameskring.com
Description::
This has dropped the 8.0.1 mass compile time down from a range of 4 to 8 hours to about 30 to 45 minutes. Rumor has it that NI Field Sales engineers are recommending this tool to customers who are applying the 8.0.1 patch.
Version History:
1.0.0:
Initial release of the code.
1,392 downloads
Submitted