Mark Balla
-
Posts
607 -
Joined
-
Last visited
-
Days Won
41
Content Type
Profiles
Forums
Downloads
Gallery
Everything posted by Mark Balla
-

[CR] Mark Balla's Icon Editor
Mark Balla replied to Mark Balla's topic in Code Repository (Certified)
It looks like the old one was deleted. (probably my fault) I've created a new one Here and a new disccussion was created also -
[CR] Mark Balla's Icon Editor V2.7>= LV2017
Mark Balla posted a topic in Code Repository (Certified)
View File Mark Balla's Icon Editor V2.7>= LV2017 Mark Balla Icon editor V2.7 December 2020 Author: Mark Balla Description: This is a text based vi icon editor The purpose is to help quickly create text base icons. The editor can be used in place of the standard NI icon editor or as a stand alone vi. see instructions. Version 2.7 Updated font table to recognize the standard "Small Font" letters used by the NI icon editor. This will improve the OCR function when importing icons generated by the NI Icon editor. Version 2.6 Added quick drop code to allow the user to switch between NI and custom editor. QD_Swap Icon Editor.vi and support folders will be placed in the LabVIEW quick drop folder ..\National Instruments\LabVIEW 20XX\resource\dialog\QuickDrop To switch LabVIEW to a custom icon editor that uses the lv_icon.vi set a shortcut key to call the QD_Swap Icon Editor.vi. Ctrl-Space Ctrl-<<assigned letter key>> To switch LabVIEW to the NI icon editor that uses the lv_icon.lvlibp use the same shortcut key with the Shift key Ctrl-Space Ctrl-Shift-<<assigned letter key>> Version 2.5 Fixed install bug where lv_icon.lvlibp was not being renamed after LV 2016 2.5 was set to 2017 or later. Instructions: LV 2017 to LV2020 + Ver 2.7 + LV 2010 to LV 2016 Ver 2.4 Install using JKI VI Package Manager LV 2009 Ver 2.3 1:Rename the curret LabVIEW 2009 Icon editor LabVIEW 2009\resource\plugins\lv_Icon.vi to a different name so it will not be overwritten. 2: Place the three files (lv_icon.vi, color templates.bin and the folder lv_icon_Subvis) in the LabVIEW 2009\resource\plugins directory. The next time the icon editor is called LabVIEW will use the lv_icon.vi instead of the standard one. There is a button on the editor that will allow you to use NI's editor (Old editor not the new one) when a text icon is not desired. For LabVIEW 8.2 Use the "MB Icon Editor_V2.3_LV82.zip" file For LabVIEW 8.5 Use the "MB Icon Editor_V2.3_LV85.zip" file For LabVIEW 8.6 Use The "MB Icon Editor_V2.3_LV8.6.zip" file Submitter Mark Balla Submitted 10/19/2009 Category LabVIEW IDE LabVIEW Version 2017 License Type BSD (Most common) -
Version 2.7.1.1
4,709 downloads
Mark Balla Icon editor V2.7 December 2020 Author: Mark Balla Description: This is a text based vi icon editor The purpose is to help quickly create text base icons. The editor can be used in place of the standard NI icon editor or as a stand alone vi. see instructions. Version 2.7 Updated font table to recognize the standard "Small Font" letters used by the NI icon editor. This will improve the OCR function when importing icons generated by the NI Icon editor. Version 2.6 Added quick drop code to allow the user to switch between NI and custom editor. QD_Swap Icon Editor.vi and support folders will be placed in the LabVIEW quick drop folder ..\National Instruments\LabVIEW 20XX\resource\dialog\QuickDrop To switch LabVIEW to a custom icon editor that uses the lv_icon.vi set a shortcut key to call the QD_Swap Icon Editor.vi. Ctrl-Space Ctrl-<<assigned letter key>> To switch LabVIEW to the NI icon editor that uses the lv_icon.lvlibp use the same shortcut key with the Shift key Ctrl-Space Ctrl-Shift-<<assigned letter key>> Version 2.5 Fixed install bug where lv_icon.lvlibp was not being renamed after LV 2016 2.5 was set to 2017 or later. Instructions: LV 2017 to LV2020 + Ver 2.7 + Here is the intended process. Download package from LAVA Install Package Package will install MB icon editor files Package will install QD_Swap Icon Editor.vi in the QD plugins folder Package will copy the lv_icon.lvlibp And rename it to COPY_ lv_icon.lvlibp Package will delete the lv_icon.lvlibp Popup will show stating you are using the custom editor. Open LV Open QD, click configure and select the Ctrl-Key Shortcut Tab at the top Assign a control key to the QD_Swap Icon Editor and click OKWhen you select Ctrl-Space Ctr-<<Assigned Key>> the QD vi will setup the IDE to use my custom editor. The vi will verify there is a copy of the lv_icon.lvlibp And if not create it. The vi will delete the lv_icon.lvlibp From the ..\National Instruments\LabVIEW 20XX\resource\plugins folder When you select Ctrl-Space Ctr-Shift-<<Assigned Key>> the QD vi will setup the IDE to use the NI editor. The vi will copy the COPY_lv_icon.lvlibp and rename the copy to lv_icon.lvlibp LabVIEW will use the lv_icon.lvlibp If it sees it in the plugins folder. If it does not see the lv_icon.lvlibp It will call the lv_icon.vi which is the name of my icon editor. LV 2010 to LV 2016 Ver 2.4 Install using JKI VI Package Manager LV 2009 Ver 2.3 1:Rename the curret LabVIEW 2009 Icon editor LabVIEW 2009\resource\plugins\lv_Icon.vi to a different name so it will not be overwritten. 2: Place the three files (lv_icon.vi, color templates.bin and the folder lv_icon_Subvis) in the LabVIEW 2009\resource\plugins directory. The next time the icon editor is called LabVIEW will use the lv_icon.vi instead of the standard one. There is a button on the editor that will allow you to use NI's editor (Old editor not the new one) when a text icon is not desired. For LabVIEW 8.2 Use the "MB Icon Editor_V2.3_LV82.zip" file For LabVIEW 8.5 Use the "MB Icon Editor_V2.3_LV85.zip" file For LabVIEW 8.6 Use The "MB Icon Editor_V2.3_LV8.6.zip" file -
[CR] Mark Balla's Icon Editor
Mark Balla replied to Mark Balla's topic in Code Repository (Certified)
I've updated the icon editor to include a 2009 version. -
Certified 10-16-09 Placed in the LabVIEW IDE section
-
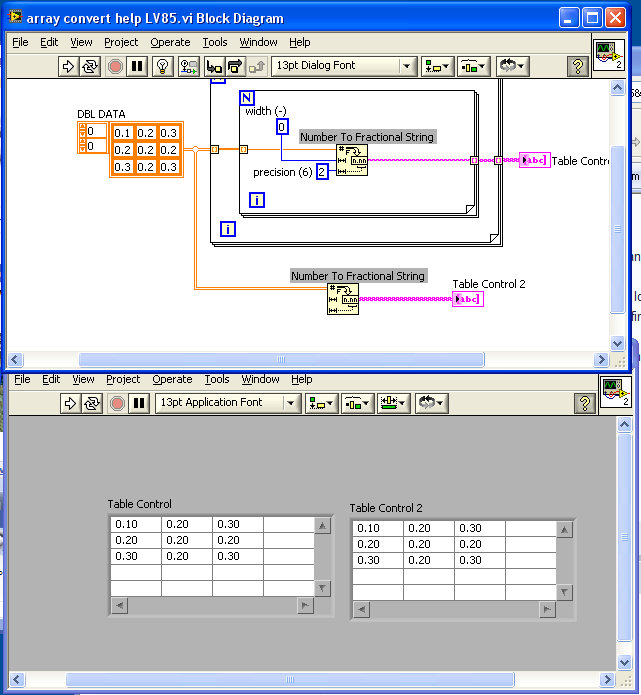
You can use the For Loop to do the indexing for you. Also the Number To Fractional String .vi is poly morphic so you can wire the array straight in. here is how I would solve your problem array convert help LV85.vi

-
Certified 9-22-09 Moved to UI Group
-
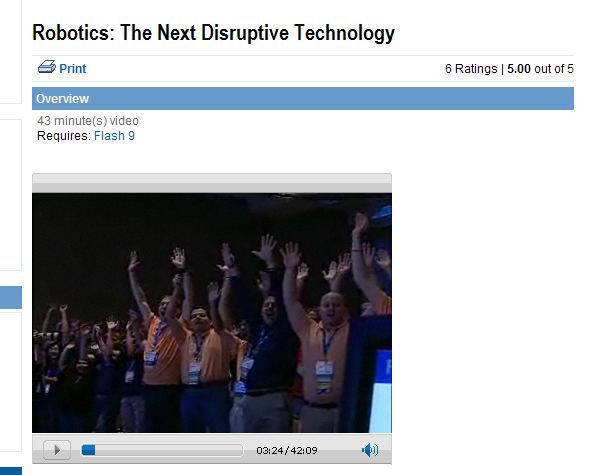
We think Robots Rock along with many others If you want to see a great presentation on robots check this out NI Week 2009 Keynote
-
Awesome!! Chalk up one more CLA in Chicagoland.
-
If you have ever given Aristos Queue a Kudo or been helped by one of his post then here is your chance to give back. In his presentation Wednesday at NI Week he asked that everyone go to the Idea Exchange and vote for Tag an XControl as the default control/indicator for a LabVIEW class All you need to do is click on the link, logon and then click on the star in the upper left corner Here is the discription LabVIEW classes are how you create new data types in LabVIEW. But part of being a new LV data type is having a front panel representation. Although users can write XControls for displaying their classes, and they can put those XControls in the palettes, whenever a user of their class chooses "Create Control" or "Create Indicator" for the LabVIEW class terminal, they get the cube display. In order to really add a new data type to LabVIEW that behaves as well as, for example, the Timestampp or the Waveform, there needs to be some way to associate a class with an XControl and say, "This particular XControl should be used as this class' default control/indicator whenever one needs to be built." (To prevent infinite recursion and load dependency problems, whenever you did Create. I also like this Idea. The main reason that I have avoided classes in the past is because I couldn't see the class data values passing in and out of a class vi. While you are in the Idea exchange checkout all the other Ideas and vote for your favorites. NI is going to use this site to help determine future functions of LabVIEW.
-
For those planning to go to this session on Tuesday @ 4:45 it has been moved to Thursday This email has been sent to notify you that Advanced Error Handling Techniques in LabVIEW has been moved to Thu, 06 Aug 1:00 PM.Your personal schedule has a conflict with this new time and you have been dropped as a registrant for this session. For additional questions, contact niweek@ni.com (888)564-9335
-
Here is a quick demo of an x-control I threw together. There is an issue with changing the value and being able to change the state (Pressed or Unpressd) If you want both operation to be done by a left mouse click. I’ve thought of 2 way to maybe solve this issue. The first way would be to create a click zone and when the user is ready to change states he left clicks in that area. The click zone needs to be reasonable distance away from the knob pointer so the proper operation will happen. The second method would be to use a left click to change the value and a right click to change the state. I’ve implemented both methods in this xcontrol. Xcontrols are a bit of a pane to work with if you are new to LabVIEW so I also included the basic code in the demo. Use the best one for you. Let me know how it works out Mark Click and rotate.zip
-
I am creating a MAP of all the location I plan to visit at NI Week and thought it might be useful to those who are new to Austin. Feel free to add location that you want others to be aware of.
-
[CR] Insert Type Conversion RCF Plugin
Mark Balla replied to Francois Normandin's topic in Code Repository (Certified)
I created a jing Video showing 3 things (For some reason it won't imbed into the post) One kudo One Bug One Request. Great RCF Mark -
Submission Approved 7-27-09. Moved to User Interface group. Thanks John Great submission. I look forward to your NI Week presentation Mark
-
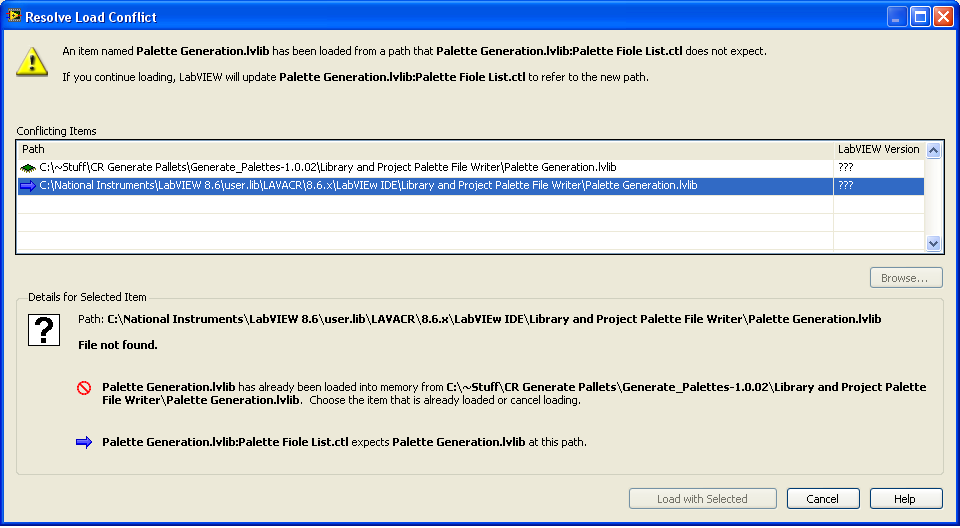
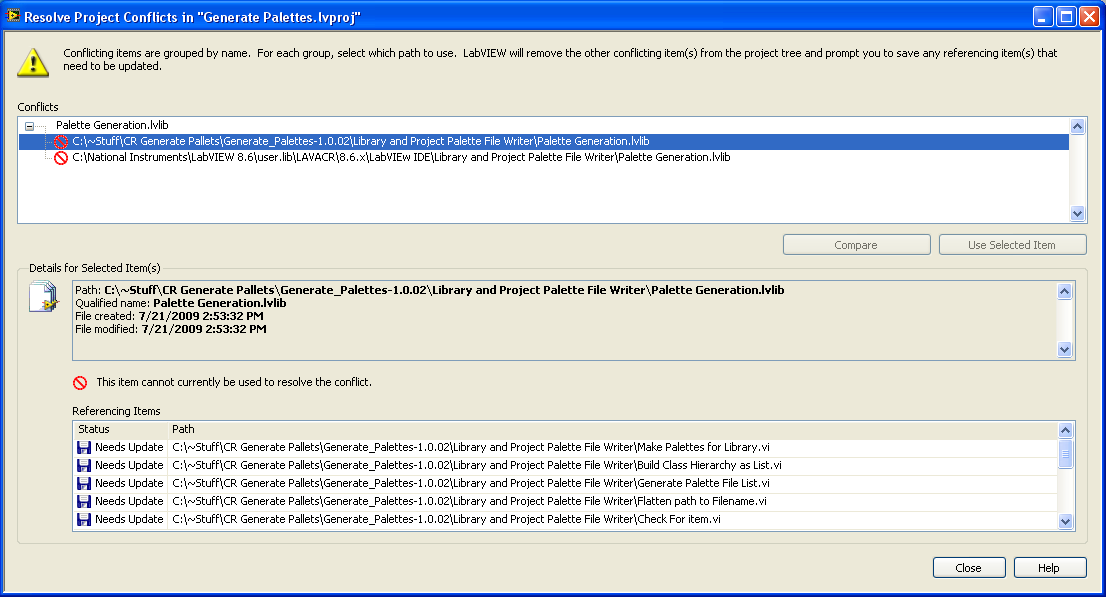
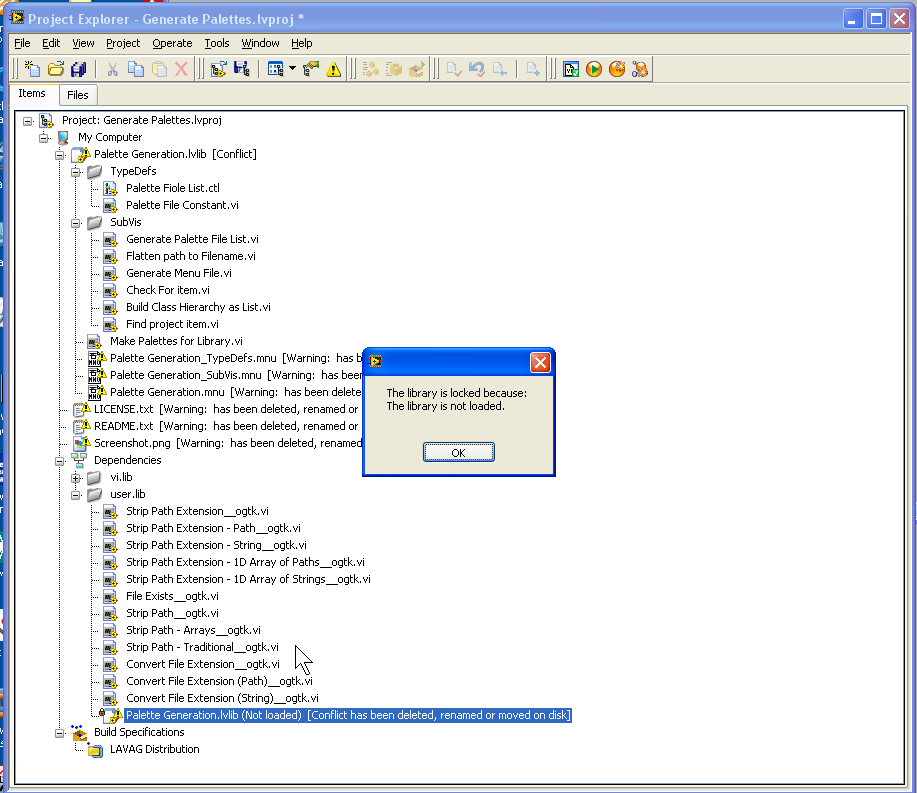
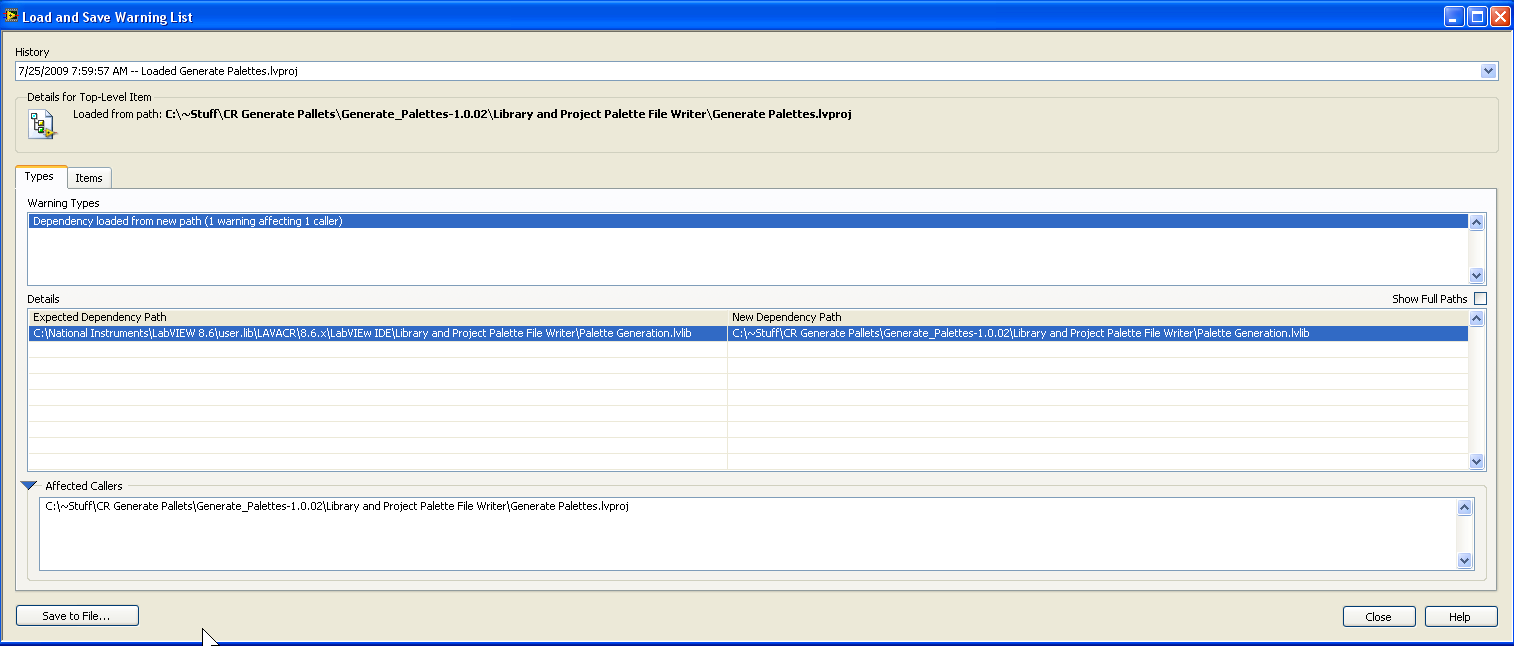
Hi Gavin I am seeing some issues with the 1.0.2 version. With the new CR we are asking that the .zp file also include the labview version EX: Mycode_LV86_V10 I am also seeing many issues with conflicts and missing vilib below are some screen shots It looks like a vilib is missing and that the project is trying to link back to your user lib Documentation, Readme text, Licence all look good.
-
Can we order the shirts Yet? We're only a few weeks away from NI WEEK.
-
[CR] NI Web Service Server
Mark Balla replied to John Lokanis's topic in Code Repository (Certified)
Submission Certified and placed in the "Remote Control, Monitoring and the Internet" Catagory -
Who better to share this with then my fellow LAVA members? I just got my CLA results back today and I PASSED!!!!!!!! Everything seems new. New Certification New LAVA New LabVIEW in a month And I can’t wait till the NEW RCF (Right Click Framework) Comes out.
-
Congratulations John! You were the first one to have submitted and approved code in the LAVA 2.0 Code Repository with Ping dotNET.
-
Hi John, We are in the process of updating the Code Repository submission process. Here is a rough draft of the requirements. LabVIEW Code (Moderators discretion) Appropriate level of Documentationincluding the use of the VI Documentation, Free text on the Front Panel and/or Block Diagram. You don't need to include a novel, but please consider the average level of knowledge of a LabVIEW programmer that has never seen your code before. [*]Appropriate Error handling[*]Follow basic style guidelines Minimize wire bends Use the 4-2-2-4 pattern for subvis Meaningful icons Code does not take-up multiple screens. Code conforms to stated function Code must be useful Zip File The .zip file must end with the LabVIEW version and the software version in the following format [filename_LV##_v###] example [Mysubmission_LV86_v100] Must contain Organized LabVIEW code Must contain Readme.txt file Recommended to contain the FP screen shot I am attaching a readme .txt template to fill in and an example readme for reference. README fillin.txt README example.txt Here are the steps to submit you code Create a Readme.txt file Create a screen shot of your application Place the Readme.txt , screenshot and the Organized LabVIEW code in the .zip file Name the .zip file as required. Go to the LAVA Code Repository Tab (http://lavag.org/ind...p?app=downloads) and click on the “Upload File” button. Select a category that best fits your submission and press “continue Fill in the file Information. Copy the contents of the readme file into the Description box Replace any email addresses with –see readme file for contact information. Attach zip file and screenshot found in the File Management area. Click on the “Add Submission” button to complete. A Moderator will then be assigned to review the code and if it passes it will then be placed in the Code Repository. Once approved a support topic will be generated in the CR Forum (http://lavag.org/for...tory-certified/) Edit MB: I left out an item in the templates added dependencies: 7-7-09
-
It's nothing you are doing wrong I verified this issue we will try to fix this ASAP.
-
Restoration of code repository files
Mark Balla replied to Oliver Barrett's topic in Site Feedback & Support
There are still a few left to add. Do you know the name of the CR you are looking for It could be one I still need to put in or It may be in a different catagory. -
Name: Mark Balla's Icon Editor Submitter: Mark Balla Submitted: 02 Jul 2009 File Updated: 18 Oct 2009 Category: LabVIEW IDE Version: 2.3.0 LabVIEW Version: 2009 License Type: Creative Commons Attribution 3.0 Mark Balla Icon editor V2.3 October 2009 Author: Mark Balla --see readme file for contact information. Description: This is the second version of my vi icon editor and was created in LV8.2., 8.6, 2009 The purpose is to help quickly create text base icons. The editor can be used in place of the standard NI icon editor or as a stand alone vi. see instructions. Instructions: LV 2009 1:Rename the curret LabVIEW 2009 Icon editor LabVIEW 2009\resource\plugins\lv_Icon.vi to a different name so it will not be overwritten. 2: Place the three files (lv_icon.vi, color templates.bin and the folder lv_icon_Subvis) in the LabVIEW 2009\resource\plugins directory. The next time the icon editor is called LabVIEW will use the lv_icon.vi instead of the standard one. There is a button on the editor that will allow you to use NI's editor (Old editor not the new one) when a text icon is not desired. Version 2.1: Along with the auto drawing and Text compressing from version 1, version 2 has 2 new features. 1: In addition to the 2 color format in version 1 the icon editor now supports a 5 color format (Frame, Header text, Header Back, Body Text, and Body Back). This is the standard frame that many programmers use. 2: In version 2 the last 10 icon color sets are saved in a binary file and are recalled each time the editor is open. These color sets can then be selected and reused. Version 2.2: Along with the all the features from version 2.1, version 2.2 has several new features. 1: A new color picker was added. The standard NI color picker has been replaced by one that will only show the legal 221 colors allowed by LabVIEW for icons. My thanks to Justin Goeres for the idea. 2:Key navigation has improved. The key navigation will only set focus to the text boxes to navigate between boxes use the tab, enter, up and down keys. My thanks to boone_93 for the idea. 3:Improved UI. The buttons and current and previous icons have been relocated for a more intuitive look. I have also added tip strips to the buttons and history array. My thanks to ahull for the idea. 4:Random color picker. A random color button has been added to help pick colors. My thanks to Dave Graybeal for the idea. 5: FP auto centers. The icon editor will now open in the center of the primary display. My thanks to tcplomp for the code. 6: The ability to read the text in the icon was added. If the icon to be changed was previously created by this icon editor the program will automatically detect the characters in the icon and convert them back into strings. This function allows for small changes like color changes and spelling mistakes to be changed without having to type all the text over. This one was all mine. 7:Bug with Panel close fixed. When the user presses the x in the upper right corner the editor will shut down gracefully instead of locking up. I made a avi file that shows some of the new features for Version 2.2 which I posted the support thread. Version 2.3: Along with the all the features from version 2.2, version 2.3 has several new features. 1: Icon Sizing and Positioning: Now Icons to be sized smaller than 32x32 by changing the “Rows” and “Width” controls. The icon can then be positioned using the “Position” control. My thanks to tcplomp for the Idea. 2: Static or Auto sizing Icons: If the “Icon Sizing selector is set the Static the icon will only draw the number of row indicated by the “Rows” control. If the selector is set to Auto the icon will adapt to the minimum number of text lines filled in. 3: Selectable Header: The icon header can be removed or enabled by changing the state of the “Header” checkbox. 4: Header and Sizing Information Saved: The header and sizing information are now save in the template files and are displayed at the bottom in the “History” array. The sizing and header settings are shown in the icon text of each template icon the when room allows. The history array now saves the last 50 icon templates to the template file 5: Color Picker Will Save Current Color in History: To get the color picker to save a new color in the color history array click on the “Current Color” box and it will be added the color history. 6: Improved Text Fitting: Text fitting inside the icon has been improved 7: Improved Text Recognition: Text recognition of the icon characters had been improved 8: Other Improvments: all key presses are ignored until the icon is created and text is in the string controls. Please feel free to give me feedback. This version has benefited greatly from ideas given to me by coworkers and other programmers License: Creative Commons Attribution 2.5 License For LabVIEW 8.2 , 8.5, 2009 Use the "MB Icon Editor_V2.3_LV82.zip" file For LabVIEW 8.6 Use The "MB Icon Editor_V2.3_LV8.6.zip Lor LabVIEW 2009 Use the current download Click here to download this file
-
QUOTE (PeterB @ May 31 2009, 12:54 AM) I have a fairly useful time saving creation that uses scripting found Here. I've also created a few Screen Cast videos here and here showing how it works.