

hooovahh
-
Posts
3,433 -
Joined
-
Last visited
-
Days Won
289
Content Type
Profiles
Forums
Downloads
Gallery
Files posted by hooovahh
-
Find References XNode
Description
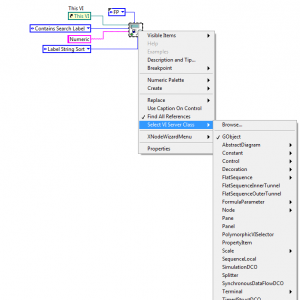
This zip contains an XNode which makes finding references to objects easier. The core of the attached XNode is a modified version of the Find References by Label VI that can be found in the vi.lib. This VI will return the first match of a control that has the label provided. This modified version has the ability to find all references that match a label given a string which the label contains, starts with, ends with, or it can be an exact string. So for instance it can find all objects that start with "Numeric".
This XNode still has the ability to return a single scalar reference like the original, which can be done by right clicking the XNode and un-selecting "Find All References". By default it returns an array of references found.
If multiple references are chosen, the order of those references can be changed. An enum is used to change the sort method from String Sort, Numeric Sort, Sort from Left to Right, Sort from Top to Bottom, or Sort from Top to Bottom then Left to Right. This is most useful when you have controls on a front panel arranged in a grid.
Another improvement over the native function, is the output reference type is changed to a selected class. Right click the XNode and go to Select VI Server Class to select an object type. There is also a browse button which brings up a dialog where the list can be alphabetized, and a simple string can help find the type desired.
Other features of the native function are still provided like using caption labels on controls, and searching the front panel, block diagram, or other owning reference types.
Demonstration
Below is a video showing the basic operation of the XNode. It demonstrates how to find control references, and how the sort, and search features work. It then shows that the same technique can be used to find any object type on the block diagram too.
http://screencast.com/t/gFBen503rg
XNode Disclaimer
NI does not provide support XNode development. It is an experimental technology and neither I, nor NI can be held accountable for unexpected operation.
For an introduction to XNodes read Adam Rofer's "XNodes - A Crash Course" presentation (http://lavag.org/files/file/56-xnodes-a-crash-course-powerpoint).
Dependencies
OpenG Error Library-4.2.0.23
OpenG Array Library-4.1.1.14
OpenG String Library-4.1.0.12
OpenG LabVIEW Data Library-4.2.0.21
623 downloads
Updated
-
Variant Repository
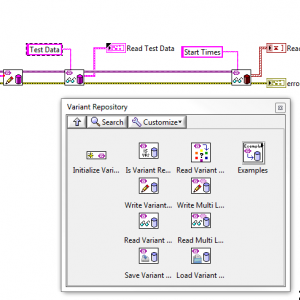
Description This package contains functions for reading and writing Variant Repositories. A Variant Repository is a variant which behaves similar to a look up table with key value pairs. Using the Write Variant Repository tags can be written using any data type. Similarly the Read Variant Repository can read back the data. The type of the data can be specified and the output of the read will be of that type. Provide the type as an input, or right click the read and select the data type to read. If the type isn't specified the read function will try to look at the data type upstream from the read and set the type to that. Errors will be generated if the tag doesn't exist, or if it exists but is the wrong data type. Multiple tags can be written or read, by right clicking the read or write function. These multiple read/write functions deal with arrays of data to read or write, and an array of tags to go along with the data. Multi-Level Variant Repositories can also be written or read. This will write a Variant Repository, as a tag to another Variant Repository. Because of this, two levels of keys are needed for reading and writing, the Section, and the Tag. Type selection, and multiple reads or writes behave like the normal read or write Variant Repository functions. When writing values into a Variant Repository there is an optional Write Once input. This is set to false by default, but if a tag is written when this is true then attempting to write this tag again will return an error. Variant Repositories can be saved to a semi-human readable INI file. This data can also be read back from the INI file. XNode Disclaimer The Read, Write, Read Multi Level, and Write Multi Level functions are implemented as XNodes. NI does not provide support XNode development. For an introduction to XNodes read Adam Rofer's "XNodes - A Crash Course" presentation (http://lavag.org/files/file/56-xnodes-a-crash-course-powerpoint). Dependencies OpenG Comparison Library-4.0.0.3 OpenG Variant Configuration File Library-4.0.0.5 OpenG String Library-4.1.0.12 OpenG LabVIEW Data Library-4.2.0.21 OpenG Error Library-4.2.0.23 OpenG Array Library-4.1.1.14 LAVA Palette-1.0.0.1 Variant Repository-1.0.0.7 Variant_Probe-2.4.1 The attachment is in the form of a Package Configuration and contains the Variant Probe package found here. The reason I included it is because it is the only package that is needed but can't be found on the Package Network. This package is only needed to demonstrate one of the examples and isn't critical to any Variant Repository function. This Has Been Done Before Yup it sure has. Having a look-up table with key value pairs has been done many different ways, from CVTs, the LabVIEW Container, and native Variant Attributes just to name a few. But some of these have really poor performance, while this implementation is meant to be as little over head as possible. But the real benefit is the XNode type adaption, and type prediction. Just write anything, and then read it using the correct type without needing to perform any explicit type conversion. Because the data type is really a variant, no extra functions are needed to get to the data. This can be good or bad. Yes a class could be used to restrict the data, but with a simple implementation I feel like that would get in the way. My opinion may change in the future but for now I love that a normal tool like the Variant Probe can just look at the tree view of a Variant Repository without any extra tools or conversions. Variant Repositories also combine the WORM (Write Once Read Many) paradigm. A write can be set to write once, and then attempting to write again will generate an error.
1,261 downloads
Updated
-
Circular Buffer
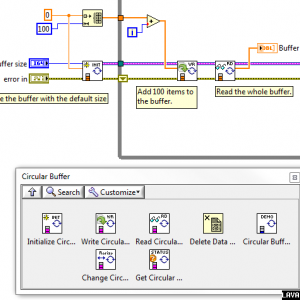
Description This package contains functions for maintaining a circular buffer. Create the Circular Buffer using the Initialize Circular Buffer function. This makes a DVR, and the data type of the DVR changes based on the data type specified for the circular buffer. The data type can be any type as long as it is not an array. It must be a scalar. The size of the buffer is specified on initialization but can be changed using the Change Circular Buffer Size function. Add data to the circular buffer using the Write Circular Buffer function. Scalar values can be added, or a 1D array of data can be added. The data type of the values to be written is the data type defined in the initialize function. Read the data back out of the circular buffer using the Read Circular Buffer function. The data type of the read values will be the data type defined in the initialize function. Cleanup the program by destroying the DVR on exit. An example VI Circular Buffer Demo shows how a Circular Buffer can be used. XNode Disclaimer The Initialize, Read, Write, Get Status, and Change Size functions are implemented as XNodes. NI does not provide support XNode development. For an introduction to XNodes read Adam Rofer's "XNodes - A Crash Course" presentation (http://lavag.org/files/file/56-xnodes-a-crash-course-powerpoint). Dependencies LAVA Palette-1.0.0.1 How It Works The source is all open and the template VIs for each XNode is what is executed when the XNode is generated. This means you are welcome to try to further optimize these XNodes by editing the templates. A new instance of the XNode will need to be placed which will force the new code to be used. If anyone finds performance improvements for these functions please feel free to post in the support topic. Because the size of the buffer is practically unbounded, I wanted to avoid unnecessary data copies, which is why it is designed around DVRs. There exists 3 things in the DVR, the buffer size, a pointer to the current write location in that buffer, and the array of scalar values, whos data type is defined during the initialization.
999 downloads
Updated
-
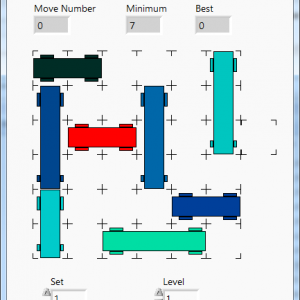
Traffic Jam Game
By hooovahh in *Uncertified*
Has your stressful day at work got you down? Want to take a load off and relax with a game? Why not a LabVIEW game? Here is a game I made a while ago and forgot about. It is called Traffic Jam similar to this, or this one called Rush Hour. The basic goal of the game is to get the red car out of the parking lot, by moving the other cars. Cars can only move in one direction and can't turn.
My coding style has improved over the years, but I'm not yet ashamed of the work I did on it. It was fun working with the picture control and generating the UI based on the level files.
This game comes with 122 levels. Why 122? Because I forgot to put in the last 18. Feel free to add them yourself by editing the Set text files.
This game also keeps track of your high score, so you can try to go back and do it in less moves.
234 downloads
Submitted
-

Windows Environment Variable Reader Writer
Windows Environment Variable Reader Writer Vc
Copyright © 2006, Brian Hoover
All rights reserved.
Author:
Brian Hoover
**see email address in readme txt**
Description::
Purpose:
This Vi was made so that you can easily view and create environment variables from within Windows XP.
Features:
You are able to read all environment variables which you have available to you at the command prompt by typing "set". It also can write environment variables by writing them to the registry in the following location:
HKEY_CURRENT_USER\Environment
Also for added safty it will check the name you are trying to use, and won't allow its creation if a variable with that name already exists.
Usage:
To use this VI you need to be using Labview version 8.20. With Labview 8.20 installed open the VariableReadWrite.vi file, then click run. While it's running open the View Variables tab and click "Refresh Variables" to view all your command prompt variables.
Two String arrays are created, the Name of the variables, and their values. A text window is also displaying what the user would see if they typed "set" at a command prompt.
To create a variable open the Create Variables tab and fill in the information for Variable Name and Variable Value; then click Create Variable. Please note that you may need to log off then back on for the new variable to take effect.
If needed there is a "Run Regedit" button which will open the registry. From here you can see the newly created variables in the location mentioned in the Features section.
When you are done click stop to end the program.
Version History:
1.0.0:
Initial release of the code.
1,483 downloads
Submitted
-
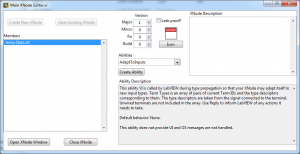
XNode Editor
8 Years ago the first version of the XNode Manager was posted to the code repository in an attempt to allow the editing of XNodes. Being a fan of XNodes, but knowing that the XNode Manager is pretty limiting because of its age, I set out to make a new version with similar functionality.
The XNode Manager had a blank XNode, and blank Abilities that it just made copies of. This is fine but then the abilities and XNode are quite old. There were many new Abilities added since version 8.2 and you can't add them using the XNode Manager. My XNode Editor reads your LabVIEW resource and populates the list of abilities to create from the ones that are possible to create. Then VI server is used to create the XNode, State control, and Abilities. This sets up the connector pane like it should and should work with all future versions of LabVIEW, until NI changes something that breaks it. It also reads in the XNode Ability descriptions to help understand how to use the new ability VIs.
In addition to being able to create and edit XNodes, you also can edit the XNode icon, and description, along with adding any new abilities.
Be aware this uses several private functions, and several undocumented features that could be potentially bad. I did a decent test to make sure memory leaks weren't a problem and I made several XNodes and Abilities and it seems stable. But at the end of the day if it blows up and crashes, don't be surprised, you've been warned. The original thread with discussion and progress on this tool was started here.
434 downloads
Updated
-
Hooovahh Array VIMs
By hooovahh in *Uncertified*
Here is the Hooovahh Array VIMs. This initial release contains VIMs for manipulating array data, which are intended to replace OpenG functionality, but with the added benefit of data type propagation, and increased performance using newer array manipulation techniques. In later versions other Array manipulation functions were added moving all the OpenG stuff to their own palette.
Version 2.0 changed the suffix naming standard. Updating may mean replacing calls to the new versions since the name on disk has changed. This was for consistency and I'm sorry for breaking compatibility. The added type defs in 2.0 may break compatibility too but these help avoid code breaking bugs since VIMs allowed any data type previously.
Most of the OpenG functions are unchanged, but a few use the newer conditional and concatenating tunnels. And a few functions have added performance based on other inputs. For instance the Delete Array Elements can operate in a more efficient way if the input indexes are already sorted. The Filter 1D array can also be more efficient if the input is known to not contain any duplicates.
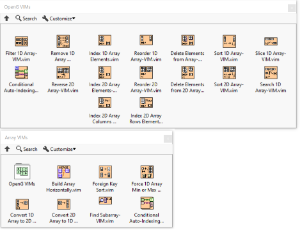
Because these packages contain VIMs, they require LabVIEW 2017 or newer. Having these functions be VIMs mean all functions work with various array data types. Included functions are:
Conditional Auto-Indexing Tunnel Delete Elements from (1D or 2D) Array Filter 1D Array Index (1D or 2D) Array, Scalar, Row, Column Remove Duplicates from 1D Array Reorder (1D or 2D) Array Reverse 1D Array Slice 1D Array Sort (1D or 2D) Array Convert 1D to 2D Convert 2D to 1D Find Subarray Force Array Min/Max Size Foreign Key Sort266 downloads
Updated
-
LabVIEW Tray Launcher
By hooovahh in *Uncertified*
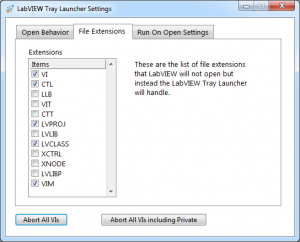
This application is designed to help manage a system, that has multiple versions of LabVIEW installed. It does this by adding an icon in the system tray for launching any version of LabVIEW installed. This may work with 64-bit versions of LabVIEW but it has never been fully tested. It has several other features which are useful when having multiple versions of LabVIEW installed.
Launch any version of LabVIEW installed from the system tray icon. Kill or restart any version of LabVIEW running from the system tray icon. Abort all VIs running in all versions of LabVIEW from the system tray icon. (not asynchronous clones at the moment) Abort all private context VIs from the settings dialog found by double clicking the system tray icon. (not asynchronous clones at the moment) Control what version of LabVIEW is used on opening a VI or LabVIEW file. (File Extension support in the configuration dialog) Configuration can chance the behavior of this but by default it will ask what version of LabVIEW to open a VI in if more than one version can open it. By default a VI set to Run On Open will always ask what version, and if you would like to run it on open or just open it. Shift can be held when opening a VI to always be asked what version to use. CTRL can be used to select the default option which is generally the last version used. By default if only one version of LabVIEW is running, and it can open the VI, then it will be opened in that version. Other file extensions can be selected after the install. Read the Readme Usage for more information on how this works. For this software to function properly, at least one LabVIEW Run-time, or development needs to be installed which is version 2011 or newer. The source includes all versions from 2011 to 2017. The installer includes the builds from all versions 2011 through 2017. An AutoIt script and source are included which selects the right EXE based on what version of the run-time engine are installed. This is why multiple versions are included in the installer.
Also for VI Server functions to work properly each version of LabVIEW needs to be configured to have TCP/IP configured and a unique port. This is all done automatically through VIPM so my suggestion is to configure all versions of LabVIEW through VIPM, at which point this tool should work. Some features of this will work without this enabled but not all of them.
This is the LabVIEW Tray Launcher, originally discussed and developed in 2009 here.
A fully built installer for version 1.5.0 can be found here. Just download the installer and run it. It should add all the needed files to the Program Files directory, and edit the registry if you allow it during the install.
162 downloads
Submitted
-
Hooovahh's Tremendous TDMS Toolkit
By hooovahh in *Uncertified*
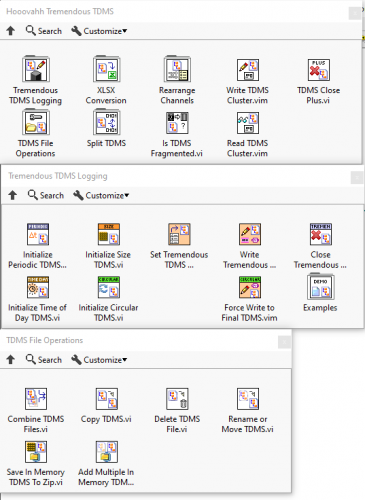
This toolkit combines a variety of TDMS functions and tools into a single package. The initial release has a variety of features:
- Classes for Circular, Periodic, Size, and Time of Day TDMS generation with examples of using each
- Reading and Writing Clusters into TDMS Channels
- XLSX Conversion example
- File operations for combining files, renaming, moving, and saving in memory to zip
- Basic function for splitting TDMS file into segments (useful for corrupt files)
- Reorder TDMS Channel with Demo
There is plenty of room for improvements but I wanted to get this out there and gauge interests. The variety of classes for doing things, along with VIMs, and class adaptation makes for using them easier. If I get time I plan on making some blog posts explaining some of the benefits of TDMS, along with best practices.
202 downloads
Updated
-
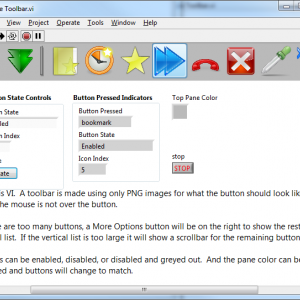
Toolbar Class
By hooovahh in User Interface
Toolbar Class
Copyright © 2014, Brian Hoover (hooovahh)
Author:
Brian Hoover (hooovahh)
Environment Support:
LabVIEW 2011 and up
Windows only (likely XP and newer) due to .NET dependency
Description:
This is a toolbar class designed to make toolbars in the UI, which appear more like normal toolbars seen in Windows.
The idea for this came about because I wanted a way to make a simple toolbar, but didn't want to have to make all the button states for mouse not over, mouse over, mouse down. I just wanted to provide one PNG file for a button, and have it take care of how the button should look.
I also wanted a way to handle when there are more buttons than there is room for horizontally. When this happens I wanted a More Options button to appear which when clicked gives a vertical list of the remaining buttons, and a veritcial scrollbar if there are too many buttons to show vertically.
I also wanted support for basic veritcal and horizontal separators.
This toolbar class can do all these things, and all that is needed is to provide the buttons as PNG files with alpha layers. other file types like JPG, and BMP are supported but won't look as good just because buttons don't need to be a rectangle and can have soft edges. The Add Icon(s).vi is a polymorphic and also can add images from Image Data, or the native LabVEW picture data type. But these image types have the same issue mentioned with JPG and BMP that they don't support alpha layers.
Dependencies:
This relies on the following OpenG packages, a VIPC is included.
OpenG Error Library-4.2.0.23
OpenG Application Control Library-4.1.0.7
OpenG File Library-4.0.1.22
OpenG String Library-4.1.0.12
OpenG Array Library-4.1.1.14
OpenG LabVIEW Data Library-4.2.0.21
Installation and instructions:
At the moment this is not distributed as a package but just a zip with the required files in it. Install the OpenG packages required or install the Required Packages.vipc. Then run the Example Toolbar under the Example folder. This uses images from within the Example Images folder and must be in the same directory as the Example Toolbar.vi. There is also a Toolbar Tree.vi which shows the public functions as they could appear on the palette.
Distribution:
This code was downloaded from the LAVA Code Repository found at lavag.org
942 downloads
Submitted